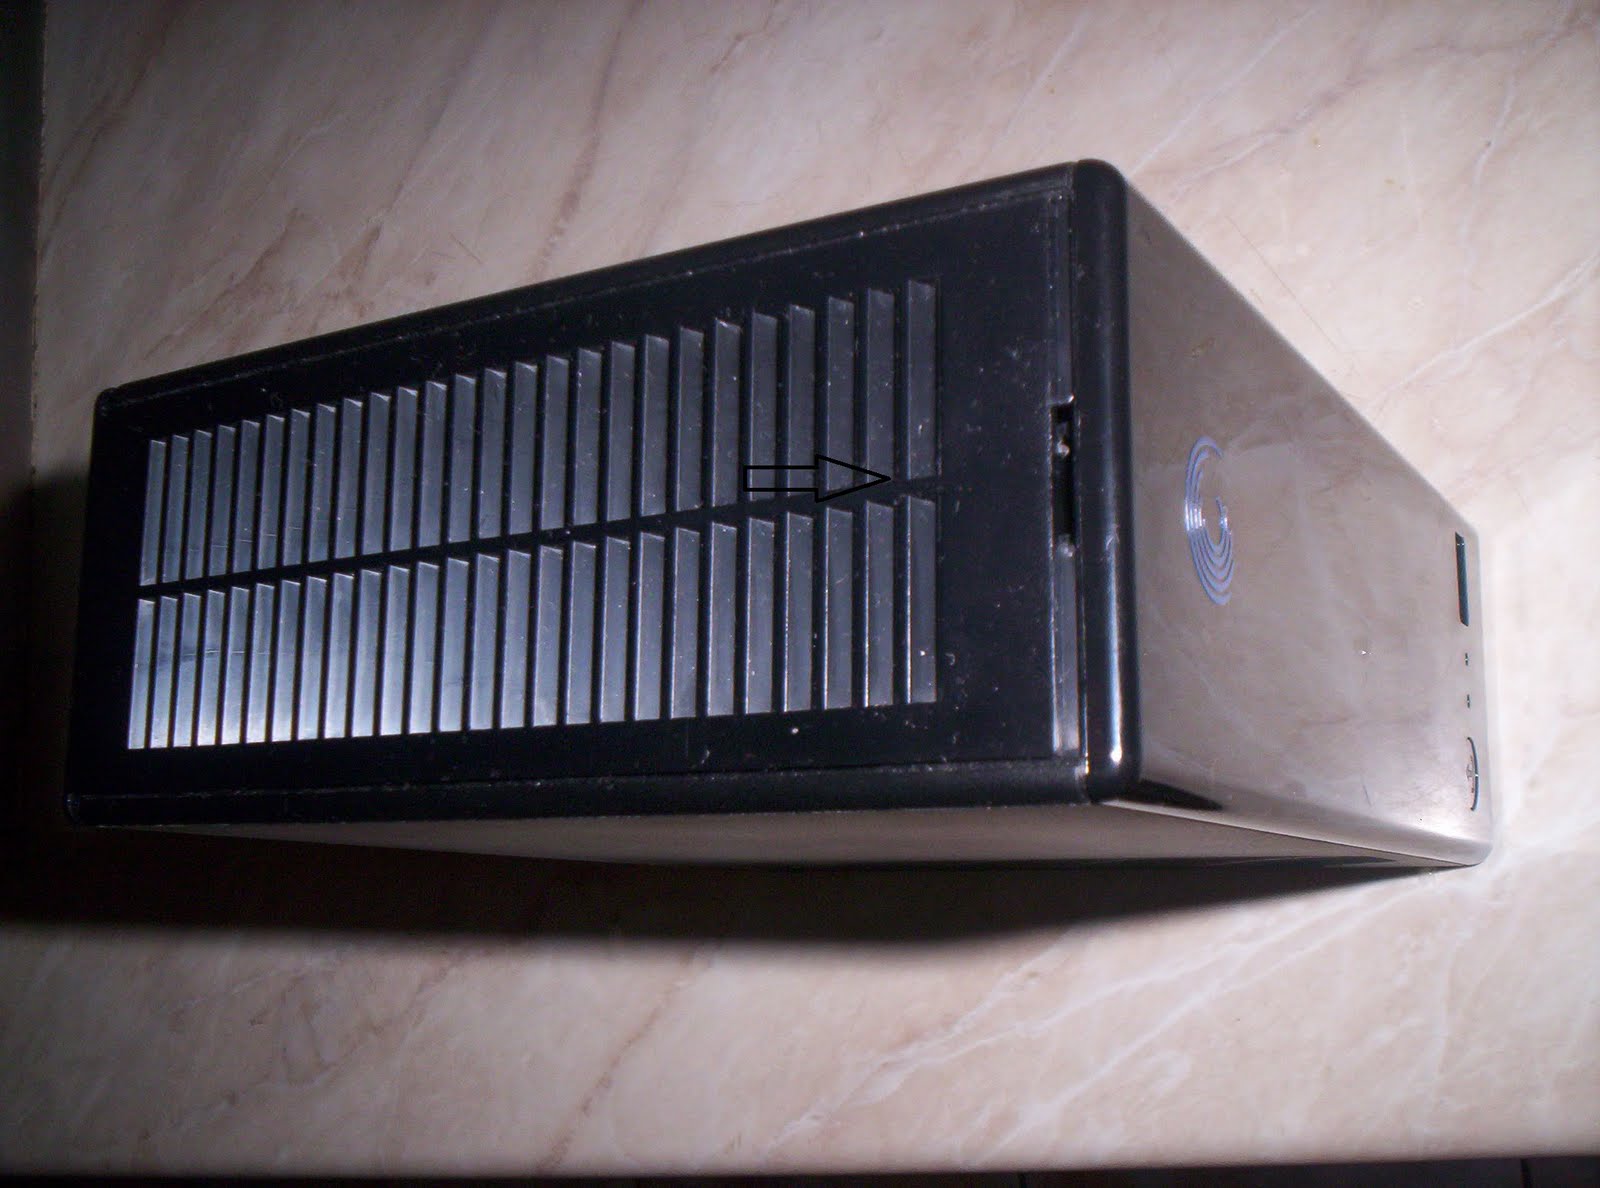
On the front of the box on top and botom there are two vents that hide the little plastic case holders. Push them with a screwdriver and at the same time push the top of the case backwards.
At both sides there are 3 more elements.

 Ok here's the drive and circut cage.

Remove all the screws you can find then slide the hdd out side. After that you can slide the board outside.
The disk is a ST1000528AS, "made in china" ........damn...i wish it was made in Filipines or Malaysia....maybe that's why people are talking abbout Hdd failure ater a few monts.

The board is held by 3 screws.
If you zoom in next to IC's are the labels of them.

 Bottom right is a 4 pin connector dont know yet the purpose but a wild guess is serial COM port
List of components:
ARM CPU : 88F6-LG02 88F6192
Here's Hajo's tut for this device:
#
# Misc notes on the Seagate Blackarmor NAS, V1.15
#
# (C) Hajo Noerenberg 2010-2011
#
# http://www.noerenberg.de/hajo/pub/seagate-blackarmor-nas.txt
#
#
# +++ WARNING +++
# MODIFYING YOUR DEVICE WILL VOID YOUR WARRANTY! IT IS
# POSSIBLE TO BRICK YOUR DEVICE! USE AT YOUR OWN RISK!
# I AM NOT LIABLE FOR ANY DAMAGES TO YOUR SYSTEM OR
# ANY LOSS OF DATA!
#
1. Enable SSH on the Seagate Blackarmor 220 NAS - the easy way
1. Download my 'unofficial' service pack (SP42) and use the manual
firmware upgrade process through the web interface:
http://www.noerenberg.de/hajo/pub/sg2000-2000.1337.sp42.img
(do NOT rename the file!)
This image (service pack) does not contain any device-/model-specific
files (e.g. no kernel) and may work on other Seagate Blackarmor
models as well (not tested -- please let me know).
Update: You have to rename the file to match the major model number
of your NAS (sg1000-1000.1337.sp42.img for the 1xx series,
sg4000-4000.1337.sp42.img for the 4xx series).
Update: This SP works on the BA440 (reported by Mike)
Update: This SP works on the BA110 (reported by Tudeskie)
2. ssh root@ with password 'atsahs'
Make sure to change the root password as soon as possible!
2. Install Debian GNU/Linux 5.0.7 (Lenny) on the Blackarmor 220 NAS
WARNING: This process completely replaces the original Seagate
firmware! The SP modifies the NAND flash of your NAS. This may
possibly damage your device permanently! You have been warned!
Installation of the Debian/GNU Linux system is only recommended
for people with (at least) basic linux administration skills.
1. Download my customized Debian GNU/Linux image (2 files):
http://www.noerenberg.de/hajo/pub/custom-rootfs_full.tar.gz
http://www.noerenberg.de/hajo/pub/custom-rootfs_full.tar.gz.md5
Upload both files to the 'Public' share of your NAS. Do
not rename the files.
2. Download my unofficial 'fw upgrade' service pack (SP99) and use
the manual firmware upgrade process through the web interface:
http://www.noerenberg.de/hajo/pub/custom-sg2000-2000.1337.sp99.img
(rename the file to 'sg2000-2000.1337.sp99.img' before uploading)
3. ssh root@ with password 'root' (generally, the IP changes
after Debian installation, try to scan your network for new IPs!)
Notes:
- The SP modifies the original Seagate preroot image (NAND flash
partition 2) to fix some bugs (Seagate/Wistron guys: 'exec /sbin/init'
is the correct way to start the init process). This modification
should not affect the normal operation of the NAS (e.g. booting the
official firmware).
- The SP does not overwrite the official firmware image (NAND flash
partition 4). If you insert clean harddisks into your NAS, the
official firmware gets installed (make sure to completely remove
the GPT partition table which is located at the *end* of the
harddisk).
- This SP does not replace the linux kernel image and therefore
does not depend on any specific hardware. It _might_ work on
other Seagate BA NAS models as well.
- After applying the SP, the system starts with a Debian Lenny minimal
system (basic system binaries and SSH daemon only). However, you are
free to install additional packages via the Debian package management
system. For configuration, you'll have to use your favourite text
editor.
- Make sure to change the root password as soon as possible.
- Run 'apt-get update' before installing any new packages. Otherwise
you'll get weird errors about missing dependencies.
- Suggested additional Debian packages: nfs-kernel-server samba
vsftpd iscsitarget
- Do not *upgrade* the Debian system. The linux kernel image (NAND
partition 4) is compatible with Debian Lenny. The latest Debian versions
(Squeeze ...) require an updated kernel udev subsystem and therefore
you would have to update the kernel image first. As of now, nobody
has done this laborious work (forward port Seagates h/w-specific patches,
compile and test the kernel)
- This modification has been tested on a BA220 with fw 2000.0631.
Update: It works on the BA420 (reported by lnxmnky)
Update: It works on the BA110 (reported by tuxmania)
Update: It works on the BA440 (reported by Isaac_X)
3. Enable SSH on the Seagate Blackarmor 220 NAS - for real men
1. Remove both SATA drives from the NAS and connect them to your local
linux computer.
2. Execute the following cmds (adjust sda1/sdb1 as needed). Do NOT change
the MD device name (/dev/md0), otherwise your NAS will not boot anymore!
~ $ mdadm -A /dev/md0 /dev/sda1 /dev/sdb1
mdadm: /dev/md0 has been started with 2 drives.
~ $ mkdir /mnt/md0
~ $ mount /dev/md0 /mnt/md0
~ $ echo "ssh stream tcp nowait root /usr/sbin/dropbear dropbear -i" >> /mnt/md0/etc/inetd.conf
~ $ umount /mnt/md0
~ $ mdadm -S /dev/md0
mdadm: stopped /dev/md0
3. Reconnect SATA drives to the NAS
4. ssh root@ with password 'atsahs'
(board name 'SHASTA' reversed, http://en.wikipedia.org/wiki/Mount_Shasta)
4. Increase NFS performance
By setting 'async' mode, I successfully transferred a 20 GB file
(ghettoVCB VM snapshot) in 35 minutes to the NAS (GBit network).
Warning: with 'async' mode, data integrity is not guaranteed anymore!
1. Temporarily change options: edit /etc/exports ('sync'->'async') and reboot
2. Permanently change options: edit web interface source code:
~ $ grep all_squa /proto/SxM_webui/admin/inc/wixNFS.class
$nfs_exports_ary[$path] = "*($permission,all_squash,sync,insecure,anonuid=$uid,anongid=$gid)";
5. Deobfuscate Seagate firmware image (.img -> .tgz)
~ $ export FW="sg2000-2000.0631.img"
~ $ dd bs=5120 if=$FW of=$FW.tgz skip=15 seek=0 count=1
~ $ dd bs=5120 if=$FW of=$FW.tgz skip=1 seek=1 count=14
~ $ dd bs=5120 if=$FW of=$FW.tgz skip=0 seek=15 count=1
~ $ dd bs=5120 if=$FW of=$FW.tgz skip=16 seek=16
~ $ tar tvzf $FW.tgz
6. Seagate Blackarmor 220 NAS hardware
- Marvell Feroceon, 800 MHz, ARM926EJ-S, Sheeva CPU Core Technology
- Marvell 88F6192 A0 LE Board, Kirkwood (the successor of Orion) SoC series
- 128 MB RAM
- 32 MB Flash
http://www.marvell.com/products/processors/embedded/kirkwood
http://www.marvell.com/products/processors/embedded/kirkwood/FS_88F6180_9x_6281_OpenSource.pdf
(Page 23, 25-33)
Similiar devices: QNAP Turbo NAS (TS-119, TS-219 and TS-219P),
LG N2B1DD1 series
7. Flash layout BA220
dev: size erasesize name
mtd0: 000a0000 00004000 "uboot"
mtd1: 00010000 00004000 "param"
mtd2: 00200000 00004000 "preroot"
mtd3: 00280000 00004000 "uimage"
mtd4: 01a00000 00004000 "rootfs"
mtd5: 000c0000 00004000 "misc"
mtd6: 02000000 00004000 "flash"
8. Serial connector
The following pinout has been published by user Mike (BA440) on
the Seagate Support Forum. It works for the BA220, too.
Please make sure to use a 3.3V cable (search for 'CA-42 USB').
A 5V TTL cable may damage your NAS permanently.
CN4
9|-X-0-|10
7|-0-0-|8
5|-0-X-|6
3|-0-X-|4
1|-X-0-|2
Pin 1 - TX
Pin 4 - RX
Pin 6 - GND
Pin 9 - VCC 3.3V
Baud rate 115200
9. TFTP/NFS-Boot the BA NAS with your own kernel and OS (for testing purposes)
Connect serial cable, interrupt boot process by pressing any key. Then
execute (TFTP/NFS server setup not described here. Adjust IPs as needed):
1a. Load kernel via TFTP:
setenv ipaddr 10.0.0.123
setenv serverip 10.0.0.1
tftpboot 0x40000 uImage
1b. Load kernel from NAND flash partition 3
nand reset; nand read.e 0x40000 0x002c4000 0x00226400; check_crc32 KrNl
2. Set NFS parameters and start kernel (extract my
custom-rootfs_full.tar.gz to the NFS server directory. Remove "/" from
etc/fstab, otherwise e2fsck will prevent the system from starting)
setenv bootargs $(console) root=/dev/nfs rw nfsroot=10.0.0.1:/mnt/nas-root ip=10.0.0.123:10.0.0.1:::debian-armel:egiga0:none
bootm 0x40000
10. BA kernel details
Linux kernel 2.6.22.18 with Marvell KW (Kirkwood) LSP release 4.2.7
patch (support for Feroceon CPU, MV SATA, MV ethernet, ...). See
LspReadme.txt and LspReleaseNotes.txt in the LSP kernel source dir.
Seagate and Maxtor GPL Open Source Downloads:
http://www.seagate.com/ww/v/index.jsp?locale=en-US&name=gpl&vgnextoid=02d819e56cdee010VgnVCM100000dd04090aRCRD
10.1 Ethernet status
~ $ hexdump /proc/net/wix_tool
0xB -> 1011 -> link up, 100MBit/s full duplex ethernet connection
bit0: 1=link up 0=link down
bit1: 1=FD 0=HD
bit2: 1=giga
bit3: 1=100
none of bit 2 or bit3: 10
10.2 GPIO interface, drivers/wixgpio/wixgpio.c
~ $ cat /proc/wixgpio/gpio
LEDs, LC Display, HDD power, CPU power
I have instaled Debian Lenny on the device plus SAMBA, FTPD, Transmission an many more.
The device works fine and the HDD still going strong after few years, but my home is on AC full time @ 24 Deg. Celsius.
More info @ http://forums.seagate.com/t5/BlackArmor-NAS-Network-Storage/Install-Debian-GNU-Linux-5-0-7-Lenny-on-the-Blackarmor-220-NAS/td-p/79422

The board is held by 3 screws.
If you zoom in next to IC's are the labels of them.

 Bottom right is a 4 pin connector dont know yet the purpose but a wild guess is serial COM port
List of components:
ARM CPU : 88F6-LG02 88F6192
RAM : Hynix H5PS1G63EFR - 128 MB
LAN : 88E1116R-NNC1 GB PHY
USB 2.0 HUB : GL850G HH1FA01G11
EEPROM : Samsung K9F5608U0D PCB0 - 32 MB
VRM : MAXIM 17020W TJ932 voltage regulator
others:
PKLCF FDS 8958A - 30V Dual N & P Channel MOSFET
APL5930 XL7JD - 3A ultra low dropout linear regulator
HA7499K G4 DF5G - ??
4433 BD9P2L - ??
2 pieces - 4468 DA9X1N - ??
2 pieces - 4712 BV9X1C - ??
Here's Hajo's tut for this device:
#
# Misc notes on the Seagate Blackarmor NAS, V1.15
#
# (C) Hajo Noerenberg 2010-2011
#
# http://www.noerenberg.de/hajo/pub/seagate-blackarmor-nas.txt
#
#
# +++ WARNING +++
# MODIFYING YOUR DEVICE WILL VOID YOUR WARRANTY! IT IS
# POSSIBLE TO BRICK YOUR DEVICE! USE AT YOUR OWN RISK!
# I AM NOT LIABLE FOR ANY DAMAGES TO YOUR SYSTEM OR
# ANY LOSS OF DATA!
#
1. Enable SSH on the Seagate Blackarmor 220 NAS - the easy way
1. Download my 'unofficial' service pack (SP42) and use the manual
firmware upgrade process through the web interface:
http://www.noerenberg.de/hajo/pub/sg2000-2000.1337.sp42.img
(do NOT rename the file!)
This image (service pack) does not contain any device-/model-specific
files (e.g. no kernel) and may work on other Seagate Blackarmor
models as well (not tested -- please let me know).
Update: You have to rename the file to match the major model number
of your NAS (sg1000-1000.1337.sp42.img for the 1xx series,
sg4000-4000.1337.sp42.img for the 4xx series).
Update: This SP works on the BA440 (reported by Mike)
Update: This SP works on the BA110 (reported by Tudeskie)
2. ssh root@
Make sure to change the root password as soon as possible!
2. Install Debian GNU/Linux 5.0.7 (Lenny) on the Blackarmor 220 NAS
WARNING: This process completely replaces the original Seagate
firmware! The SP modifies the NAND flash of your NAS. This may
possibly damage your device permanently! You have been warned!
Installation of the Debian/GNU Linux system is only recommended
for people with (at least) basic linux administration skills.
1. Download my customized Debian GNU/Linux image (2 files):
http://www.noerenberg.de/hajo/pub/custom-rootfs_full.tar.gz
http://www.noerenberg.de/hajo/pub/custom-rootfs_full.tar.gz.md5
Upload both files to the 'Public' share of your NAS. Do
not rename the files.
2. Download my unofficial 'fw upgrade' service pack (SP99) and use
the manual firmware upgrade process through the web interface:
http://www.noerenberg.de/hajo/pub/custom-sg2000-2000.1337.sp99.img
(rename the file to 'sg2000-2000.1337.sp99.img' before uploading)
3. ssh root@
after Debian installation, try to scan your network for new IPs!)
Notes:
- The SP modifies the original Seagate preroot image (NAND flash
partition 2) to fix some bugs (Seagate/Wistron guys: 'exec /sbin/init'
is the correct way to start the init process). This modification
should not affect the normal operation of the NAS (e.g. booting the
official firmware).
- The SP does not overwrite the official firmware image (NAND flash
partition 4). If you insert clean harddisks into your NAS, the
official firmware gets installed (make sure to completely remove
the GPT partition table which is located at the *end* of the
harddisk).
- This SP does not replace the linux kernel image and therefore
does not depend on any specific hardware. It _might_ work on
other Seagate BA NAS models as well.
- After applying the SP, the system starts with a Debian Lenny minimal
system (basic system binaries and SSH daemon only). However, you are
free to install additional packages via the Debian package management
system. For configuration, you'll have to use your favourite text
editor.
- Make sure to change the root password as soon as possible.
- Run 'apt-get update' before installing any new packages. Otherwise
you'll get weird errors about missing dependencies.
- Suggested additional Debian packages: nfs-kernel-server samba
vsftpd iscsitarget
- Do not *upgrade* the Debian system. The linux kernel image (NAND
partition 4) is compatible with Debian Lenny. The latest Debian versions
(Squeeze ...) require an updated kernel udev subsystem and therefore
you would have to update the kernel image first. As of now, nobody
has done this laborious work (forward port Seagates h/w-specific patches,
compile and test the kernel)
- This modification has been tested on a BA220 with fw 2000.0631.
Update: It works on the BA420 (reported by lnxmnky)
Update: It works on the BA110 (reported by tuxmania)
Update: It works on the BA440 (reported by Isaac_X)
3. Enable SSH on the Seagate Blackarmor 220 NAS - for real men
1. Remove both SATA drives from the NAS and connect them to your local
linux computer.
2. Execute the following cmds (adjust sda1/sdb1 as needed). Do NOT change
the MD device name (/dev/md0), otherwise your NAS will not boot anymore!
~ $ mdadm -A /dev/md0 /dev/sda1 /dev/sdb1
mdadm: /dev/md0 has been started with 2 drives.
~ $ mkdir /mnt/md0
~ $ mount /dev/md0 /mnt/md0
~ $ echo "ssh stream tcp nowait root /usr/sbin/dropbear dropbear -i" >> /mnt/md0/etc/inetd.conf
~ $ umount /mnt/md0
~ $ mdadm -S /dev/md0
mdadm: stopped /dev/md0
3. Reconnect SATA drives to the NAS
4. ssh root@
(board name 'SHASTA' reversed, http://en.wikipedia.org/wiki/Mount_Shasta)
4. Increase NFS performance
By setting 'async' mode, I successfully transferred a 20 GB file
(ghettoVCB VM snapshot) in 35 minutes to the NAS (GBit network).
Warning: with 'async' mode, data integrity is not guaranteed anymore!
1. Temporarily change options: edit /etc/exports ('sync'->'async') and reboot
2. Permanently change options: edit web interface source code:
~ $ grep all_squa /proto/SxM_webui/admin/inc/wixNFS.class
$nfs_exports_ary[$path] = "*($permission,all_squash,sync,insecure,anonuid=$uid,anongid=$gid)";
5. Deobfuscate Seagate firmware image (.img -> .tgz)
~ $ export FW="sg2000-2000.0631.img"
~ $ dd bs=5120 if=$FW of=$FW.tgz skip=15 seek=0 count=1
~ $ dd bs=5120 if=$FW of=$FW.tgz skip=1 seek=1 count=14
~ $ dd bs=5120 if=$FW of=$FW.tgz skip=0 seek=15 count=1
~ $ dd bs=5120 if=$FW of=$FW.tgz skip=16 seek=16
~ $ tar tvzf $FW.tgz
6. Seagate Blackarmor 220 NAS hardware
- Marvell Feroceon, 800 MHz, ARM926EJ-S, Sheeva CPU Core Technology
- Marvell 88F6192 A0 LE Board, Kirkwood (the successor of Orion) SoC series
- 128 MB RAM
- 32 MB Flash
http://www.marvell.com/products/processors/embedded/kirkwood
http://www.marvell.com/products/processors/embedded/kirkwood/FS_88F6180_9x_6281_OpenSource.pdf
(Page 23, 25-33)
Similiar devices: QNAP Turbo NAS (TS-119, TS-219 and TS-219P),
LG N2B1DD1 series
7. Flash layout BA220
dev: size erasesize name
mtd0: 000a0000 00004000 "uboot"
mtd1: 00010000 00004000 "param"
mtd2: 00200000 00004000 "preroot"
mtd3: 00280000 00004000 "uimage"
mtd4: 01a00000 00004000 "rootfs"
mtd5: 000c0000 00004000 "misc"
mtd6: 02000000 00004000 "flash"
8. Serial connector
The following pinout has been published by user Mike (BA440) on
the Seagate Support Forum. It works for the BA220, too.
Please make sure to use a 3.3V cable (search for 'CA-42 USB').
A 5V TTL cable may damage your NAS permanently.
CN4
9|-X-0-|10
7|-0-0-|8
5|-0-X-|6
3|-0-X-|4
1|-X-0-|2
Pin 1 - TX
Pin 4 - RX
Pin 6 - GND
Pin 9 - VCC 3.3V
Baud rate 115200
9. TFTP/NFS-Boot the BA NAS with your own kernel and OS (for testing purposes)
Connect serial cable, interrupt boot process by pressing any key. Then
execute (TFTP/NFS server setup not described here. Adjust IPs as needed):
1a. Load kernel via TFTP:
setenv ipaddr 10.0.0.123
setenv serverip 10.0.0.1
tftpboot 0x40000 uImage
1b. Load kernel from NAND flash partition 3
nand reset; nand read.e 0x40000 0x002c4000 0x00226400; check_crc32 KrNl
2. Set NFS parameters and start kernel (extract my
custom-rootfs_full.tar.gz to the NFS server directory. Remove "/" from
etc/fstab, otherwise e2fsck will prevent the system from starting)
setenv bootargs $(console) root=/dev/nfs rw nfsroot=10.0.0.1:/mnt/nas-root ip=10.0.0.123:10.0.0.1:::debian-armel:egiga0:none
bootm 0x40000
10. BA kernel details
Linux kernel 2.6.22.18 with Marvell KW (Kirkwood) LSP release 4.2.7
patch (support for Feroceon CPU, MV SATA, MV ethernet, ...). See
LspReadme.txt and LspReleaseNotes.txt in the LSP kernel source dir.
Seagate and Maxtor GPL Open Source Downloads:
http://www.seagate.com/ww/v/index.jsp?locale=en-US&name=gpl&vgnextoid=02d819e56cdee010VgnVCM100000dd04090aRCRD
10.1 Ethernet status
~ $ hexdump /proc/net/wix_tool
0xB -> 1011 -> link up, 100MBit/s full duplex ethernet connection
bit0: 1=link up 0=link down
bit1: 1=FD 0=HD
bit2: 1=giga
bit3: 1=100
none of bit 2 or bit3: 10
10.2 GPIO interface, drivers/wixgpio/wixgpio.c
~ $ cat /proc/wixgpio/gpio
LEDs, LC Display, HDD power, CPU power
I have instaled Debian Lenny on the device plus SAMBA, FTPD, Transmission an many more.
The device works fine and the HDD still going strong after few years, but my home is on AC full time @ 24 Deg. Celsius.
More info @ http://forums.seagate.com/t5/BlackArmor-NAS-Network-Storage/Install-Debian-GNU-Linux-5-0-7-Lenny-on-the-Blackarmor-220-NAS/td-p/79422